The journey from a conceptual spark to a physical product is often paved with technical hurdles that can stall even the most innovative entrepreneurs. In the world of manufacturing, the most critical phase is the transition from a
napkin sketch or a
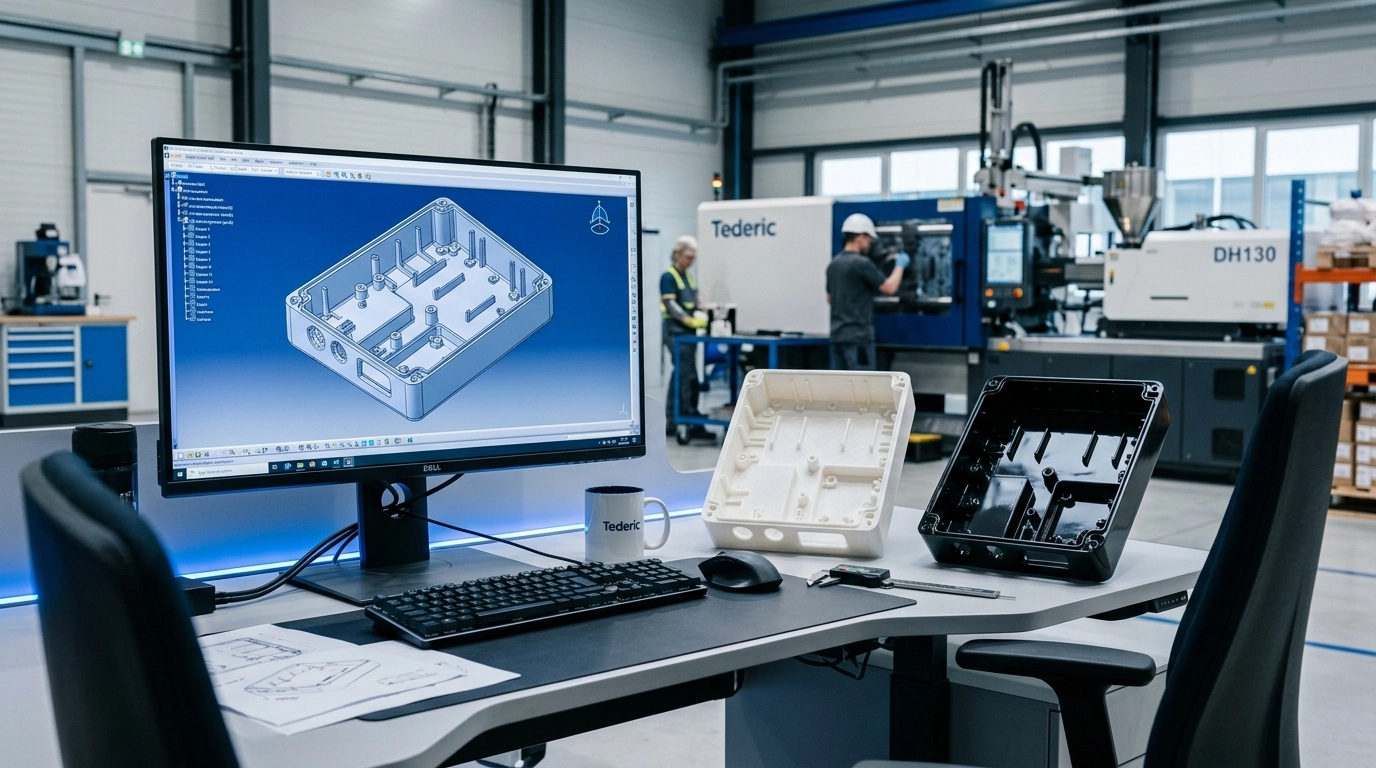
3D print to a production-grade prototype.
With a management team bringing over 50 years of collective experience,
Delaney Manufacturing Services has guided inventors and established manufacturers through this high-stakes process. Prototyping isn’t just about seeing if a part looks right; it’s about ensuring it can be manufactured efficiently, affordably, and at scale. This guide outlines the essential first steps to move your project from the drawing board to the production floor.
The Foundation: Professional CAD Design Over Napkin Sketches
Every great product starts with a vision, often captured in a simple sketch. While these drawings are excellent for communicating intent, they lack the mathematical precision required for industrial manufacturing.
The very first step in a professional prototyping journey is the creation of a
3D CAD (Computer-Aided Design) model. Unlike a flat drawing, a CAD model defines the exact geometry, volume, and tolerances of your part.

At Delaney, we specialize in
product development that bridges this gap. Our engineering team takes your initial concepts and develops them into robust CAD files designed specifically for injection molding. This distinction is vital: a design that looks good on a screen might be impossible to eject from a steel mold. Professional CAD design incorporates
Design for Manufacturability (DFM) principles from day one, saving you thousands of dollars in future tooling modifications.
Why 3D Printing Isn’t the Final Answer
Many clients come to us with a 3D-printed version of their product. While 3D printing (additive manufacturing) is an incredible tool for rapid visualization and “fit checks,” it has significant limitations compared to injection molding:
- Material Properties: 3D prints are built in layers, creating inherent structural weaknesses. Injection-molded parts are solid, isotropic units with superior strength and durability.
- Surface Finish: Achieving a retail-ready, polished, or textured finish is nearly impossible with standard 3D printing without extensive post-processing.
- Dimensional Accuracy: Injection molding allows for tighter tolerances (±0.003 inches) that are difficult to maintain consistently with many 3D printing technologies.
Transitioning to a
production-grade prototype: one made from the actual resin and through the actual process intended for the final product: is the only way to truly validate your design’s performance and market readiness.
Critical Design Rules for Injection Molding
Before you cut a single piece of steel for a mold, your design must adhere to specific “rules of the road.” Overlooking these can lead to defects like sink marks, warping, or trapped parts.
1. Uniform Wall Thickness
Consistency is king in injection molding. If some sections of your part are significantly thicker than others, they will cool at different rates. This leads to
sink marks (depressions on the surface) or internal voids. We recommend keeping walls between 40% and 60% of the thickness of adjacent walls to ensure even cooling and structural integrity.
2. The Power of Draft Angles
A “draft angle” is a slight taper applied to the vertical faces of your part. Without a draft angle (usually 1 to 2 degrees), the part will create a vacuum and stick to the mold walls, potentially damaging both the part and the tool. Proper draft is essential for a clean, automated ejection process.

3. Radii and Transitions
Sharp internal corners are stress concentrators. By adding
radii (rounded corners), you improve the flow of molten plastic and significantly increase the strength of the finished part. Smooth transitions between different geometries prevent turbulence during the injection cycle, leading to a more consistent product.
Strategic Material Selection
The choice of resin dictates more than just the color of your part; it determines the performance, weight, and cost. When moving into prototyping, you must select a material that matches the functional requirements of the end-use environment.
- High-Impact Requirements: Consider polycarbonates or ABS blends.
- Chemical Resistance: Polypropylene or specialized engineering resins may be necessary.
- Metal-to-Plastic Conversion: We often help clients re-engineer heavy metal components into high-performance, heavy-duty plastics to reduce weight and cost without sacrificing durability.
Selecting the right material early in the prototyping phase allows you to test for shrinkage and mechanical stress accurately.
Bridging the Gap with No Minimums
One of the biggest hurdles for inventors is the “minimum order quantity” (MOQ) barrier. Many manufacturers refuse to look at a project unless it involves tens of thousands of units.
At Delaney Manufacturing Services, we operate with a
no-minimum policy. Whether you need a short-run of 50 prototypes to send to potential investors or a high-volume run of one million units for a global launch, our facility is equipped to handle the load. This flexibility allows you to iterate and refine your product without the financial pressure of massive inventory overhead.
The Delaney Advantage: End-to-End Fulfillment
Prototyping is just one piece of the puzzle. The true value of a manufacturing partner lies in their ability to handle the entire product lifecycle.

Once your prototype is finalized, our
full-service fulfillment takes over. We don’t just “mold and ship” a box of loose parts. Our team provides:
- In-House Assembly: Combining molded components with electronics, fasteners, or other hardware.
- Secondary Operations: Including laser engraving for branding and serial numbers, as well as UV inkjet printing for high-resolution, full-color branding.
- Retail Packaging: Getting your product shelf-ready.
- Direct Drop-Shipping: Sending the finished goods directly to your customers or distribution centers.

Conclusion: Start with a Professional Review
The most expensive mistake you can make in product development is rushing into production with a design that hasn’t been vetted for the molding process. By focusing on professional CAD design, adhering to DFM principles, and choosing a partner that supports low-volume prototyping, you set your project up for long-term success.
Are you ready to take your “napkin sketch” to the next level? Our team of experts is standing by to provide same-day responses to your inquiries. Let’s turn your vision into a retail-ready reality.
|
| Images for illustrative purposes. |